♫ Oh the weather outside is frightful1… ♫
Today’s post is inspired once again by the Code Golf StackExchange: Draw a snowflake. Sounds simple enough, yes?
The basic idea is to take a similar sort of code to what I used about 10 months ago when I wrote a post on Brownian trees. The main difference this time is that this time we want rotational symmetry and reflectional symmetry symmetry. To do that, instead of generating points in an entire circular world, we will instead use only a slice, which we can than repeat and rotate. It turns out there’s a reasonable amount of math involved in making that actually work right, but the code should still be fairly straight forward.
First, we need to decide what data types we’re going to work with. Originally, I had a struct for both the points and the snowflakes themselves, but then I realized with have a very powerful tool at our disposal: complex numbers.
What does representing points as complex numbers buy us?
- Conversion between cartesian coordinates (
make-rectangular) and polar coordinates withmake-rectangularandmake-polar - Add offsets to points
- Determine the distance between two points with subtration and
magnitude - The ability to rate points (again via
make-polar)
Sounds worth doing. 😄
So then we just need a structure for snowflakes to start with:
(struct snowflake (radius arms points) #:prefab)

; Generate a new snowflake with the given number of arms
(define (make-snowflake radius arms)
  (snowflake radius arms '(0)))
radius and arms will be constants that store the structure of the snowflake, while points will change (sans mutation, since we didn’t make it #:mutable) as we add more points. Originally I had a grid of points, but since we’re moving going to be constantly converting between cartesean and polar coordinates and moving about in a continuous space, it didn’t work so well. On the down side, the larger an image gets, the longer it takes to compare to previous points. If I wanted to optimize this, something like a quadtree, but at the moment, this works well enough.
Next, we want the ability to add points to a snowflake, or to check if a point is currently in it:
; Rotate a point so that the angle is in the range [θ, -θ)
(define (clampθ p θmin θmax)
  (define θΔ (- θmax θmin))
  (make-polar
   (magnitude p)
   (let loop ([θ (if (= 0 p) 0 (angle p))])
     (cond
       [(<  θ θmin) (loop (+ θ θΔ))]
       [(>= θ θmax) (loop (- θ θΔ))]
       [else        θ]))))

; Test if a snowflake contains a point within a given Δ
; Return the index of the point if it does, #f otherwise
(define (snowflake-contains? s p Δ)
  (match-define (snowflake radius arms points) s)

  (define θ  (/ 2π arms))
  (define pα (clampθ p 0 θ))
  (define pβ (make-polar (magnitude pα) (if (= pα 0) 0 (- θ (angle pα)))))

  (for/first ([i (in-naturals)]
              [point (in-list points)]
              #:when (or (< (magnitude (- pα point)) Δ)
                         (< (magnitude (- pβ point)) Δ)))
    i))

; Add a new point to the snowflake
(define (snowflake-set s p)
  (match-define (snowflake radius arms points) s)
  (define θmax (/ 2π arms))
  (snowflake radius arms (cons (clampθ p 0 θmax) points)))
Oof. That’s an intense bit of code. First, the clampθ function. The goal here is, as mentioned earlier, we want to be able to take an arbitrary point and rotate it so that it’s in a range we can specify. Basically, modular arithmatic on angles, whee!
Next, checking if a snowflake-contains? a point. This has one particularly interesting argument: Δ. This basically is a margin of error. That way we can check if a point is ‘close enough’ to any of the points currently in the snowflake, thus building the brownian tree. Next, we have pα and pβ. pα is taking the point and rotating it into the proper frame of reference (giving the rotational symmetry we want), while pβ gives us reflectional symmetry.
Likewise, snowflake-set adds a point to the snowflake. This one is much simpler, just adding the point to the snowflake. Here’s where we aren’t actually mutating the snowflake, but rather returning a new copy.
Cool2.
Now, the meat and potatoes: The function that makes a snowflake grow:
; Generate a new point on the snowflake by drifting a point inwards
(define (snowflake-grow s [Δ (sqrt 2)])
  (match-define (snowflake radius arms points) s)

  (let loop ([p (make-polar radius (* (random) 2π))])
    (cond
      ; Hit an already existing point, add it and return
      [(snowflake-contains? s p Δ)
       (snowflake-set s p)]
      ; Otherwise, try to drift inwards
      [else
       (loop
        (for/fold ([p p])
                  ([step (in-list
                          (list
                           ; Drift randomly
                           (λ (p) (+ p (make-polar
                                        (* (random) Δ)
                                        (* (random) 2π))))
                           ; Drift inwards
                           (λ (p) (make-polar
                                   (- (magnitude p) (* (random) Δ))
                                   (angle p)))))])
          (step p)))])))
I think the strangest bit in this code is the for/fold in the middle. Basically, it will apply a series of functions to a point in order to make it wiggle around. Why I did this was that I was experimenting with a number of other ‘wiggle’ functions as I was developing. In the end, I only have two–one for random motion, the other for inwards drift–but I liked the style well enough so I kept it.
Specifically, the first of the two functions, will generate a new random point that is up Δ units away in any direction and add it to our current flake. The second will keep the same angle, but move directly inwards, again by a random amount up to Δ. This is exactly why we wanted to use complex numbers for our points.
So all we have to do to make a snowflake is to call this function a bunch of times in a row:
(render-snowflake
   (for/fold ([s (make-snowflake 50 6)])
             ([i (in-range 20)])
     (snowflake-grow s 4)))
(We’ll define render-snowflake in a bit.)
Cool! We already have some nice flakey structure. Let’s take it out to it’s logical conclusion and keep growing until we hit the radius:
; Generate an entire snowflake
(define (generate-snowflake radius arms [Δ (sqrt 2)])
  (let loop ([s (make-snowflake radius arms)])
    (define s^ (snowflake-grow s Δ))
    (if (> (magnitude (car (snowflake-points s^))) radius)
        s^
        (loop s^))))
Basically, we keep adding points. If, at any point, the newest point added was further out from the center than our radius, we’re done. Bam.
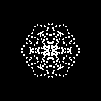
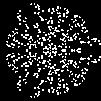
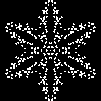
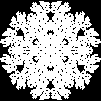
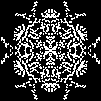
> (render-snowflake (generate-snowflake 50 6 4))
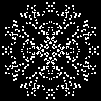
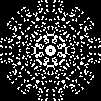
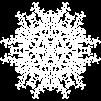
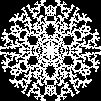
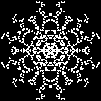
Or we can generate a bunch of snowflakes with different numbers of arms:
> (for/list ([arms (in-range 3 9)])
    (render-snowflake (generate-snowflake 50 arms 4)))

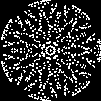
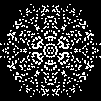
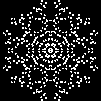
Or we can experiment with different values for the packing radius:
> (for/list ([Δ (in-list (list 1 (sqrt 2) 2 3 π 4))])
    (render-snowflake (generate-snowflake 50 6 Δ)))
Okay, so how have I been rendering these things?
; Render a snowflake to a bitmap
(define (render-snowflake s)
  (match-define (snowflake radius arms data) s)
  (define size (+ 1 (* radius 2)))

  (flomap->bitmap
   (build-flomap*
    1 size size
    (λ (x y)
      (define p (make-rectangular (- x radius) (- y radius)))
      (vector (if (snowflake-contains? s p 1) 1 0))))))
Simple. That’s the beauty of making that snowflake-contains? function as we did earlier.
One neat trick that we can do though, since we have all of the points ordered by how they were added to the snowflake (albeit in reverse), we can render each step along the way as a single frame:
; Render a snowflake being formed
(define (render-snowflake/frames s)
  (match-define (snowflake radius arms data) s)

  (define snowflakes
    (reverse
     (for/fold ([s* (list (make-snowflake radius arms))])
               ([pt (in-list (reverse data))])
       (match-define (list* first rest) s*)
       (match-define (snowflake _ _ data^) first)
       (list* (snowflake radius arms (cons pt data^)) s*))))

  (map render-snowflake snowflakes))
And turn that into a fun animation:
(require mrlib/gif)

(write-animated-gif
 (render-snowflake/frames (generate-snowflake 50 8 4))
 5
 filename
 #:last-frame-delay 50)
I’ve not used the mrlib/gif
library before (instead I’ve been using 2htdp/universe
to generate the frames and ImageMagick to combine them), but it’s really nice. Should make future animations even easier!
One step further, we can take that index from snowflake-contains? to colorize images. We just need to tweak render-snowflake a bit:
; Render a snowflake to a bitmap
(define (render-snowflake s #:colorize? [colorize? #f])
  (match-define (snowflake radius arms data) s)
  (define size (+ 1 (* radius 2)))
  (define data-length (length data))

  (flomap->bitmap
   (build-flomap*
    (if colorize? 3 1) size size
    (λ (x y)
      (define p (make-rectangular (- x radius) (- y radius)))
      (define index (snowflake-contains? s p 1))
      (cond
        [(and colorize? index) (let ([g (- 1 (/ index data-length))])
                                 (vector g g 1))]
        [colorize?             (vector 0 0 0)]
        [index                 (vector 1)]
        [else                  (vector 0)])))))
Trying it out:
> (write-animated-gif
   (render-snowflake/frames (generate-snowflake 50 8 4) #:colorize? #t)
   5
   filename
   #:last-frame-delay 50)

And there we have it. As always, the code is available on GitHub: let-it-snow.rkt
♫ Let it snow, let it snow, let it snow! ♫3