Today’s task comes from the Code Golf StackExchange. The idea behind code golf is to write a program with as few characters as possible, often rendering the code nigh on unreadable. Luckily, the same StackExchange also host popularity contests, one of which is the inspiration behind today’s post:
You are given two true color images, the Source and the Palette. They do not necessarily have the same dimensions but it is guaranteed that their areas are the same, i.e. they have the same number of pixels. Your task is to create an algorithm that makes the most accurate looking copy of the Source by only using the pixels in the Palette. Each pixel in the Palette must be used exactly once in a unique position in this copy. The copy must have the same dimensions as the Source. – American Gothic in the palette of Mona Lisa: Rearrange the pixels
Specifically for this post, we’ll be using two source images, although for testing I had a whole pile more:
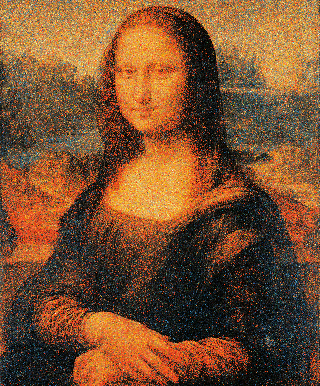
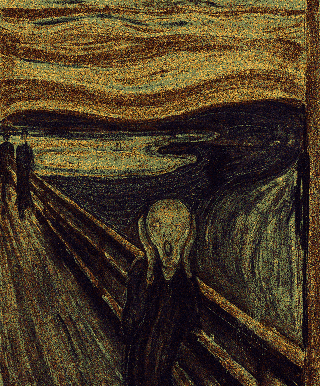
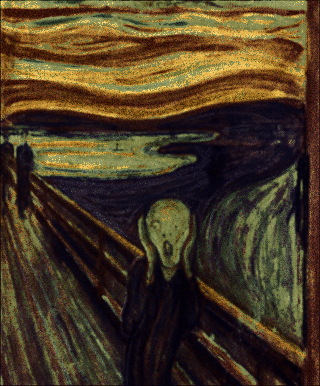
| Mona Lisa by Leonardo da Vinci, c. 1503-1506 | The Scream by Edvard Munch, 1893 |
|---|---|
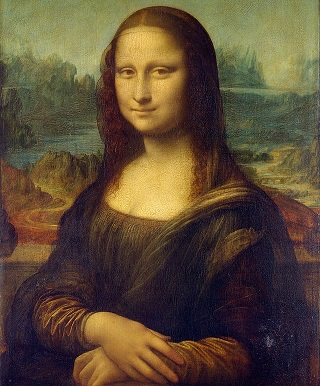 | 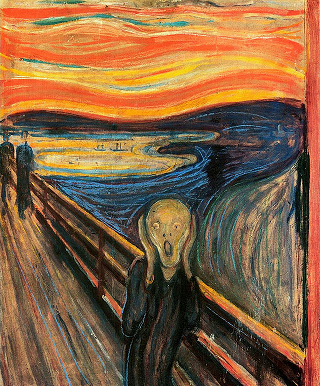 |
There are a bunch of different ways to solve this, but today we’ll go through three of them:
- Sort the colors in both images
- Swap pixels until the image is ‘close enough’
- Fill in pixels greedily
Sort the colors in both images
The first algorithm sounds crazy until you try it. In psuedocode:
- Create a list of pixels from each image
- Sort the two lists by a given comparator
- For each pair of pixels in the two lists, take the color from the target image and the location from the source image
And that’s actually it. It turns out the code is just about as simple, with most of the length going into loading and saving the images and format juggling. First, we want a way of representing pixels which in this context are a color and a location:
; A color with a location
(struct pixel (x y c) #:transparent)

; Sorting function based on grayscale value
(define (pixel<?/grayscale p1 p2)
    (< (apply + (flvector->list (pixel-c p1)))
       (apply + (flvector->list (pixel-c p2)))))
We’ll use pixel<?/grayscale as a basic sorting function. It works well enough, although it could probably be tuned to more accurately model human vision.
Next, the pièce de résistance:
; Recolor an image by sorting the pixels in both images
(define (recolor/sort original-src target-src
                      #:pixel<? [pixel<? pixel<?/grayscale])
  (define original (load-flomap original-src))
  (define target (load-flomap target-src))

  ; Generate a list of pixels in each image
  (define (pixel-list fm)
    (for*/list ([x (in-range (flomap-width fm))]
                [y (in-range (flomap-height fm))])
      (pixel x y (flomap-ref* fm x y))))

  (define original-pixels (pixel-list original))
  (define target-pixels (pixel-list target))

  ; Sort both lists by the given sorting function
  (define sorted-original-pixels (sort original-pixels pixel<?))
  (define sorted-target-pixels (sort target-pixels pixel<?))

  ; Build a map from source xy to list index to target color
  (define transition-hash
    (for/fold ([h (hash)])
              ([original-pixel (in-list sorted-original-pixels)]
               [target-pixel (in-list sorted-target-pixels)])
      (hash-set h
                (list (pixel-x original-pixel)
                      (pixel-y original-pixel))
                (pixel-c target-pixel))))

  ; Build the new image from that transition matrix
  (flomap->bitmap
   (build-flomap*
    (flomap-components original)
    (flomap-width original) (flomap-height original)
    (λ (x y)
      (hash-ref transition-hash (list x y))))))
Going through the commented blocks, we have a fairly direct match for the psuedocode. One difference is because of the structure of the build-flomap*
function. Since it’s expects a generator rather than allowing us to generate arbitrary points, it’s easier to make a map first. Still, about the same.
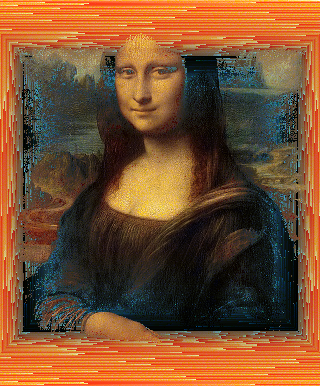
And when you apply it to the source images above?
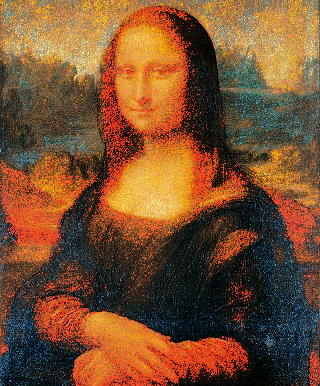
| Mona Lisa | The Scream |
|---|---|
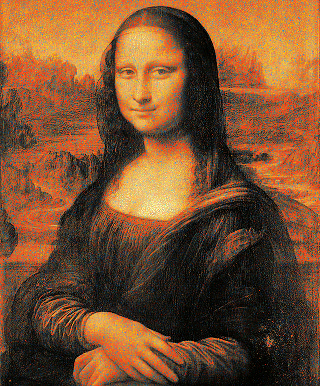 | 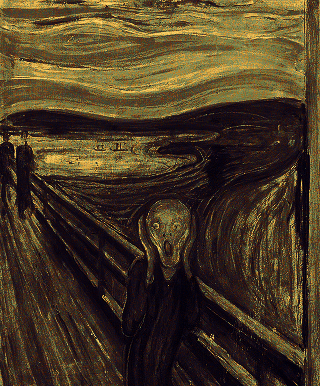 |
That’s actually really cool. It’s really interesting how sorting by the grayscale values ends up recoloring the images while preserving small details in the grain of the background. Very neat. Even cooler, it’s wicked fast. Since sorting is one of the more well understood problems in computer science, there are well known algorithms to use. In this case, our runtime is probably \mathcal{O}(n\log{}n) (with n as the number of pixels), since that is the runtime for the sort and both loading and writing the image are \mathcal{O}(n) .
Swap pixels until the image is ‘close enough’
Okay, that was straight forward. Let’s see if we can do something different. This time, let’s just brute force the problem. Rather than systematically dealing with the entire image at once:
- Scramble the pixels of the target image
- Set
counter = 0 - While
counter<threshold
- Choose two random pixels
- Calculate the ’error’ of the image with the pixels at their current location, and the error with those two pixels swapped
- If the swapped error is lower, swap the pixels and set
counter = 0; otherwise, incrementcounter
First, let’s define an error function based on the distance between two colors in RGB space (again, there are better functions we could use here):
; Find the distance between two flvectors
(define (fl-distance fl1 fl2)
  (sqrt (for/sum ([a (in-vector (flvector->vector fl1))]
                  [b (in-vector (flvector->vector fl2))])
          (sqr (- a b)))))

; Simple error function based on RGB distance
(define (error/rgb-distance original-fm target-fm color-pixel location-pixel)
    (match-define (pixel x y _) location-pixel)
    (match-define (pixel _ _ c) color-pixel)
    (fl-distance (flomap-ref* original-fm x y) c))
Using that, we can the algorithm fairly directly into Racket:
; Recolor an image by randomly swapping pixels based on improving error
(define (recolor/swap original-src target-src
                      #:threshold [threshold 100]
                      #:error-function [err error/rgb-distance])

  (define original (load-flomap original-src))
  (define target (load-flomap target-src))

  (define width (flomap-width original))
  (define height (flomap-height original))

  ; Generate a 2d vector of pixels
  (define pixels
    (list->vector
     (shuffle
      (for*/list ([y (in-range (flomap-height target))]
                  [x (in-range (flomap-width target))])
        (flomap-ref* target x y)))))

  ; Get/set a pixel in the pixel map
  (define (get x y)
    (pixel x y (vector-ref pixels (+ x (* width y)))))

  (define (set! x y c)
    (vector-set! pixels (+ x (* width y)) c))

  ; Get a random pixel (sized from the original image)
  (define (rnd) (get (random width) (random height)))

  ; Keep swapping pixels until we get a certain number of non-swaps in a row
  (let loop ([swap-count 0] [non-swap-count 0])
    (define p1 (rnd))
    (define p2 (rnd))

    (cond
      ; Haven't swapped recently, return the result
      [(>= non-swap-count threshold)
       (flomap->bitmap
        (build-flomap*
         (flomap-components original)
         (flomap-width original) (flomap-height original)
         (λ (x y)
           (pixel-c (get x y)))))]
      ; Swap is better, swap and reset count
      [(< (+ (err original target p1 p2) (err original target p2 p1))
          (+ (err original target p1 p1) (err original target p2 p2)))

       (set! (pixel-x p1) (pixel-y p1) (pixel-c p2))
       (set! (pixel-x p2) (pixel-y p2) (pixel-c p1))
       (loop (+ swap-count 1) 0)]
      ; Swap is worse, just count
      [else
       (loop swap-count (+ non-swap-count 1))])))
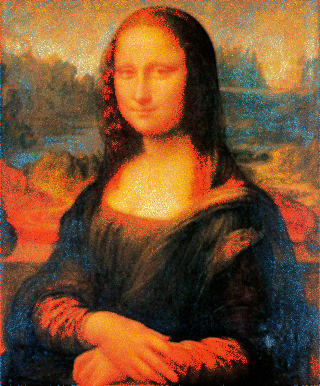
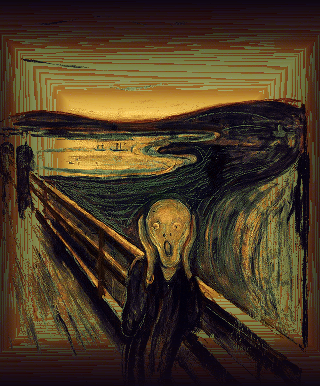
To start with, let’s go for the default threshold of 100 consecutive errors:
| Mona Lisa | The Scream |
|---|---|
 |  |
It’s a little grainy, mostly because you actually get a random spike of 100 error free swaps fairly easily (it turns out ‘random’ isn’t as uniform as most people think). Let’s try cranking the threshold up to a thousand instead:
| Mona Lisa | The Scream |
|---|---|
 |  |
That’s a lot better for The Scream, but now the Mona Lisa is having some issues with the red in hear hair. It turns out there’s a reasonable amount of brown, but too much red so they’re both fairly close in grayscale distance. Perhaps a better error metric would work better.
Also, it takes a lot longer. While sorting worked in seconds and 100 took about 30 seconds, 1000 took about 5 minutes per image. Especially in The Scream recolored, the different in quality is obvious, but the cost really isn’t worth it when you compare to how just sorting the pixels did.
Alternatively, you can try a different error function. For example, this one takes the weighted average of a 3x3 area rather than a single pixel (threshold = 1000).
; Slightly more complicated error function takes original image average into account
(define (error/rgb-distance/average
         original-fm target-fm
         color-pixel location-pixel)
  (match-define (pixel x y _) location-pixel)
  (match-define (pixel _ _ c) color-pixel)
  (fl-distance (flvector-scale
                (foldl flvector+
                       (flomap-ref* original-fm x y)
                       (for*/list ([xd (in-range -1 2)] [yd (in-range -1 2)])
                         (flomap-ref* original-fm (+ x xd) (+ y yd))))
                (/ 1.0 9.0))
               c))
| Mona Lisa | The Scream |
|---|---|
 |  |
Mostly, it just made it blurry. Which makes sense, since we’re comparing regions rather than a single pixel, so edges are less heavily influential than they were. So it goes.
Fill in pixels greedily
The third and final option was actually the first one that I came up with:
- Generate a list of all colors in the target image
- For each pixel in the source image:
- Find the most similar color in the target list
- Place that color in the result
- Remove it from the target list
As a greedy algorithm, it’s theoretically fast but likely not optimal. What you end up getting is really good results for the first part of the image but increasingly bad results as the images diverge.
One neat trick I did here was that I could have just run from the top of the image down. But that would have lost out on a lot of the detail from the center of the image. So instead, I used the racket/generator
library to make this neat gem:
; Spiral outwards from (0,0) in squares
(define (in-spiral [radius +inf.0])
  (in-generator
    (yield (list 0 0))
    (for ([r (in-range 1 radius)])
      (yield (list (- r) (- r)))
      (yield (list (- r) r))
      (yield (list r (- r)))
      (yield (list r r))
      (for ([d (in-range (+ (- r) 1) r)])
        (yield (list (- r) d))
        (yield (list r     d))
        (yield (list d (- r)))
        (yield (list d r))))))
That’s much more Pythonic than Rackety, but it does work. Essentially, you get a square spiral moving out from the origin, first every pixel with x or y 1 different from the origin, then 2, then 3, etc. Neat.
Using that, we can the psuedocode into Racket:
; Recolor an image finding the best pixels from the center out
(define (recolor/fill/slow original-src target-src)
  (define original (load-flomap original-src))
  (define target (load-flomap target-src))

  (define width (flomap-width original))
  (define height (flomap-height original))

  ; Generate a list of target colors
  (define colors
    (for*/list ([y (in-range (flomap-height target))]
                [x (in-range (flomap-width target))])
      (flomap-ref* target x y)))

  ; Generate a 2d vector of pixels
  (define result
    (for*/vector ([y (in-range (flomap-height original))]
                  [x (in-range (flomap-width original))])
      #f))

  ; Get/set a pixel in the pixel map
  (define (result-get x y)
    (vector-ref result (+ x (* width y))))

  (define (result-set! x y c)
    (vector-set! result (+ x (* width y)) c))

  ; Spiral outwards from the center of the image
  (for ([pt (in-spiral (+ 2 (quotient (max width height) 2)))])
    ; Convert to image coordinates and verify that we're in the image
    (define x (+ (first pt) (quotient width 2)))
    (define y (+ (second pt) (quotient height 2)))
    (when (and (>= x 0) (< x width) (>= y 0) (< y height))
      ; Get the source color at that point
      (define target-color (flomap-ref* original x y))

      ; Choose the closest remaining color
      (define-values (_ color)
        (for/fold ([minimum-distance +inf.0] [best-color #f])
                  ([color (in-list colors)])
          (define new-distance (fl-distance target-color color))
          (if (< new-distance minimum-distance)
              (values new-distance color)
              (values minimum-distance best-color))))

      ; Remove that color from the list to place, add it to the result
      (set! colors (remove color colors))
      (result-set! x y color)))

  ; Turn that into a bitmap
  (flomap->bitmap
   (build-flomap*
    (flomap-components original)
    (flomap-width original) (flomap-height original)
    result-get)))
That’s pretty straight forward. The most interesting bit is probably the for/fold
in the middle. It’s a quick way of finding the minimum value in a list where the value itself isn’t what you’re interested in. Another option would have been to sort with a custom sorting function, but that would in this case be slower (\mathcal{O}(n)
versus \mathcal{O}(n\log{}n)
).
| Mona Lisa | The Scream |
|---|---|
 |  |
Okay, that’s just weird. 😄 Basically, there are enough shared pixels in the two images that you can more or less reconstruct the center sections. After that though… All bets are off. You didn’t get this in either of the previous solutions because in the sorting case, they ended up spread throughout similarly color regions while in swapping they just didn’t move from where they started.
Also, there’s another problem. It’s slow. Since this was actually the first thing that I worked on, I did wanit to take a little bit of time to make it faster:
Filling pixels: Data structures strike back
The main problem with the fill solution is that for each pixel \mathcal{O}(n) , you’re going to run through every pixel in the target image (another \mathcal{O}(n) ), resulting in an \mathcal{O}(n^2) runtime. Not particularly great. Especially because we shouldn’t have to scan through the entire list (or even the average of half of it) to find the closest matching pixel.
Instead, we should be able to do something like a binary search:
- Start with a lower and upper bound of the entire list
- Until we find the closest color:
- Find the midpoint of the current bounds
- If the target color is ’less than’ that, set the upper bound to the midpoint, otherwise set the lower bound to the midpoint
- Repeat
If we could get something like that working, we would only need \mathcal{O}(\log{}n)
per lookup, reducing the runtime to the same as the recolor/sort method. And… it turns out that Racket has just the sort of data strucure we need: a splay tree. Specifically, a splay tree is a binary tree (enabling binary search), that self-adjusts (to avoid worst case badly unbalanced trees), which has the additional property of making recently accessed elements quick to access. That’s helpful in this case, since we’ll have blocks of similar colors, which are close in the tree. Neat!
In Racket, to build a splay tree, we need to set up a couple of things in the data/order
and data/splay-tree
modules:
; Find the distance between two flvectors
(define (fl-distance fl1 fl2)
  (sqrt (for/sum ([a (in-vector (flvector->vector fl1))]
                  [b (in-vector (flvector->vector fl2))])
          (sqr (- a b)))))

; Test if two flvectors are equal
(define (flvector=? flv1 flv2)
  (not (for/first ([v1 (in-flvector flv1)]
                   [v2 (in-flvector flv2)]
                   #:when (not (= v1 v2)))
         #t)))

; Test if one flvector is less than another by comparing each channel in order
(define (flvector<? flv1 flv2)
  (for/first ([v1 (in-flvector flv1)]
              [v2 (in-flvector flv2)]
              #:when (not (= v1 v2)))
    (< v1 v2)))
Then, when loading the colors instead of building a list, we can make the splay tree:
; Generate a list of target colors
(define colors
  (make-splay-tree
   (order 'pixel-grayscale-order
          flvector?
          flvector=?
          flvector<?)))

(for* ([y (in-range (flomap-height target))]
       [x (in-range (flomap-width target))])

  (define color (flomap-ref* target x y))
  (define count (+ 1 (splay-tree-ref colors color 0)))
  (splay-tree-set! colors color count))
One thing we didn’t have to do earlier was to keep track of counts for each pixel. In a list, we just duplicated the elements, for the splay tree this won’t work as well.
Then, in the recolor/fill method, we tweak the color choosing function (previously the for/fold):
...

; Get the source color at that point
(define target-color (flomap-ref* original x y))

; Choose the closest remaining color
(define iter/>= (splay-tree-iterate-least/>=? colors target-color))
(define iter/<= (splay-tree-iterate-greatest/<=? colors target-color))

(define color
  (cond
    [(and iter/>= iter/<=)
     (define c1 (splay-tree-iterate-key colors iter/>=))
     (define c2 (splay-tree-iterate-key colors iter/<=))
     (if (< (fl-distance target-color c1)
            (fl-distance target-color c2))
         c1
         c2)]
    [iter/>= (splay-tree-iterate-key colors iter/>=)]
    [iter/<= (splay-tree-iterate-key colors iter/<=)]))

(define count (splay-tree-ref colors color))
(if (= count 1)
    (splay-tree-remove! colors color)
    (splay-tree-set! colors color (- count 1)))

(result-set! x y color)

...
The method for finding the smallest element greater than / largest less than a given element that isn’t actually in the tree is a little weird, but it works out in the end. That’s one nice thing about how crosslinked all of the Racket documentation is, I could just keep looking until I found the functions that I needed.
Give this a run… And it’s a lot faster. Rather than an hour or more to run, it takes only seconds. It’s a little bit slower than the sort (since the data structure is a little more complicated), but well within the same order of runtime.
Yet more evidence that perhaps you should pay attention in data structures class. 😄
Conclusion
And, that’s it. That was a lot of fun to work out. I really love how the simplest algorithm is also the fastest and has arguably the best results (at least for these two images). So cool!
If you would like to check out the source code for today’s post, you can do so here: palette-swap. If you place multiple PNG images with the same number of pixels (aspect ratios don’t matter) in the input subdirectory and run test.rkt it will generate a whole pile of images like you’ve seen here.