Inspired half by a post on the Code Golf StackExchange and half by the corresponding website allrgb.com, today’s post tasks us with making images like this:
So what’s so interesting about that picture?
Well, at 256x128, there are 32,768 pixels in that image. And all 32,768 are different.
What’s really interesting about this is that there are all sorts of possible ways to do this. That’s sort of the entire point behind allrgb.com, although in that case, you are generating 4096x4096 images containing all RGB images (with one byte each for red, green, and blue). Perhaps by the end of the post, we can generate one of those giant images.
When I first started out, I had a few ideas for the images that I wanted to generate. Then a few more. Then even more. Each time I added more, I wanted to see how it would combine with each of the previous. As I added more and more, that got increasingly complicated. So instead, I decided to split all of the algorithms that I was writing into two halves:
- Color producers - generate a list of unique colors in some specified order
- Location producers - generate a list of locations within the target image to place each color produced by a color producer
Specifically, a producer is something that I can use with in-producer
. A thunk (a function of no arguments) that I can call over and over again that will return a new item with each call. In the case of color producers, I will be returning a vector of ARGB colors in the range [0.0, 1.0] (for use with the images/flomap
module). In the case of location producers, the returned value will be a (struct pt (x y)).
This way, I can make a new color producer and almost immediately see how it looked with all of the location producers (and vice versa). Neat, no?
To do that, I made a module each for colors and locations. For each then, I defined code something like this:
(provide list-rgb-producers
         get-rgb-producer
         in-rgb-producers)

; Interface to export all known rgb producers
(define rgb-producers (make-hash))

(define (list-rgb-producers) (hash-keys rgb-producers))
(define (get-rgb-producer name) (hash-ref rgb-producers name))
(define (in-rgb-producers) (in-hash rgb-producers))

(define-syntax-rule (define-rgb-producer (name count) body ...)
  (let ()
    (define (name count) body ...)
    (hash-set! rgb-producers 'name name)))
The basic idea is that internally, I will store a list of producers which I can easily define with my custom macro (define-rgb-producer in this case). Then when I want to use the module, I can use one of the three exported functions:
list-rgb-producers- get a list of names of defined producersget-rgb-producer- get a specific producer by name (especially helpful if I want to base one off of another internally)in-rgb-producers- a thin wrapper aroundin-hashto return both the name and function for each defined producer in turn
Everything else, including all of the functions themselves I can define privately. That way, we can write our testing code using in-rgb-producers and have it automatically generate all new variants no matter what we add. Neat!
Color producers
Okay, let’s get to the meat of the situation now. First, let’s define a whole series of color producers. Since we need a location producer to actually render these, let’s assume we have an order-producer that runs left to right, top to bottom. reading order, as it were (we’ll define it in the next section).
First thought, let’s just run directly through the RGB color space:
; Move evenly through the RGB color space
(define-rgb-producer (sequential-noskip count)
  (generator ()
    (for ([i (in-range 256^3)])
      (yield (->rgb i)))))

; Convert an integer [0, 256^3) into an ARGB flvector
(define (->rgb n)
  (define (->1.0 n) (/ n 256.0))
  (vector 1.0
          (->1.0 (bitwise-and (arithmetic-shift n -16) 255))
          (->1.0 (bitwise-and (arithmetic-shift n -8) 255))
          (->1.0 (bitwise-and (arithmetic-shift n -0) 255))))
Nice and simple. We’re using a generator
despite the performance problems mostly because they make the code so nice and clean. Also, especially once we get to the more complicated location generation code, the algorithmic complexity is going to dwarf the cost of a generator anyways…
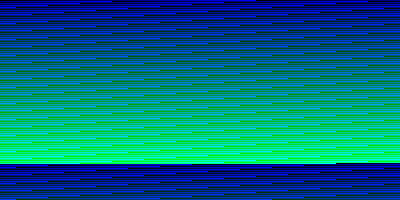
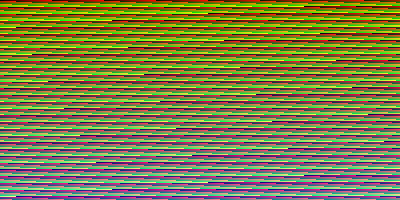
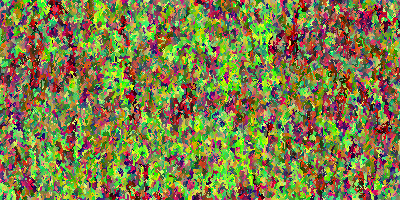
Simple enough, but it has one major disadvantage. Because we’re working in RGB, but only using 0.1% of the color space (20 thousand of the available 16 million colors), everything is blue. That’s because since we’re only changing the low bits, we change the blue value first (0-255). Green changes as well, but much slower, only getting up to around 80. Oops. So instead, let’s skip enough colors each time so we go through the entire color space:
; Move evenly through the RGB color space
(define-rgb-producer (sequential count)
  (define increment (quotient 256^3 count))
  (generator ()
    (for ([i (in-range 0 256^3 increment)])
      (yield (->rgb i)))))
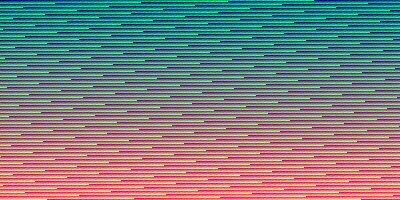
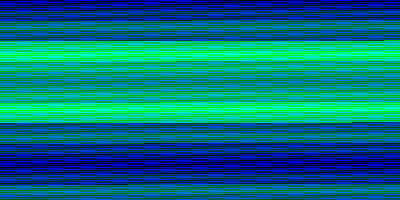
Much better. This time we have a reasonable sampling of colors. Well… sort of. This time we have the opposite problem. Now instead of too much blue, we have less blue, more red and green. This time, the problem is that since we’re changing the most in the low bits, we’re skipping over a lot of the possible values for blue in each pixel, using all of the red values and still only some of the green. What we really want to do is iterate through each of the three channels, skipping the same amount for each:
; Cascade through red, then green, then blue
(define-rgb-producer (cascade count)
  (define increment (inexact->exact (floor (/ 256 (expt count 1/3)))))
  (generator ()
    (for* ([r (in-range 0 256 increment)]
           [g (in-range 0 256 increment)]
           [b (in-range 0 256 increment)])
      (yield (->rgb (+ r (* 256 g) (* 256 256 b)))))))
One problem is that unless you have a specific power, this isn’t quite going to give you an even split, but it’s certainly better than the previous examples.
Another idea would be to make use of gray codes, rather than directly use the indicies. Also known as a reflected binary code, the idea of a gray code is that between any two values, you change only one bit. This has two advantages. First, gray codes avoid the sudden change we have in previous images where we go from the end of one iteration to the beginning of the next. Second, gray codes essentially form a space filling curve. If you have a power of 2, n gray codes will cover the same space as n sequential values, just in a different order. Let’s see what that means for our color generation:
(define (->gray-code i)
  (bitwise-xor (arithmetic-shift i 1) i))

; Generate codes using gray codes
(define-rgb-producer (gray-code-noskip count)
  (generator ()
    (for ([i (in-range 256^3)])
      (yield (->rgb (->gray-code i))))))
(define-rgb-producer (gray-code count)
  (define increment (quotient 256^3 count))
  (generator ()
    (for ([i (in-range 0 256^3 increment)])
      (yield (->rgb (->gray-code i))))))
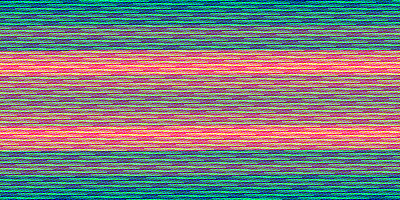
As before, if you don’t skip you get change mostly in the lowest/blue channel with a slower change in the green. None at all in the red. If you skip around though, you get exactly the pattern we’re looking for, smooth changes uniformly through the entire color space. Nice!
Last but not least, let’s through all this nice theoretically color space stuff out the window. Random colors for the win!
; Randomly generate colors (regenerating on duplicates)
(define-rgb-producer (randomly count)
  (define used (make-hasheq))
  (λ ()
    (for*/first ([_ (in-naturals)]
                 [new-color (in-value (random 256^3))]
                 #:when (not (hash-has-key? used new-color)))
      (hash-set! used new-color #t)
      (->rgb new-color))))
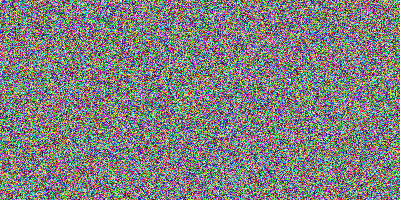
Optimally, I’d like to call that one random, but that would shadow the call to random made to actually choose a color. Can’t very well do that, now can we?
Also, this one has a major performance problem, especially with larger images. Can you guess what it is?
Location producers
Okay, enough with the color generation. That should be enough for the moment. Let’s instead move on to location producers. First, we’ll start with the simple one we’ve been actually using all along:
; Left to right, top to bottom
(define-order-producer (reading width height get-new-color get-color-at)
  (generator ()
    (for* ([y (in-range height)] [x (in-range width)])
      (yield (pt x y)))))
Simple enough. That generates the images we’ve seen above:
This time, you may have noticed a few more parameters. Specifically, this time we care about not just how many colors to generate, but also the size of the iamge we’re going to put them in. Likewise, in some of the later functions, we’re going to want to determine which color we’re about to place (generated from the color producers) and what neighbors we’re about to place it nearby. In the next section, we’ll have to show how we came to those last two functions / parameters.
How about next, we spiral from a central point outwards. This is similar to the in-spiral function I defined in the post on palette swapping, only this time we’ll use a Queue_(abstract_data_type) rather than a generator:
; Spiral from the center point outwards
(require data/queue)

(define-order-producer (spiral width height get-new-color get-color-at)
  (define q (make-queue))
  (enqueue! q (pt (quotient width 2) (quotient height 2)))

  (define (in-bounds? p)
    (match-define (pt x y) p)
    (and (>= x 0) (< x width)
         (>= y 0) (< y height)))

  (λ ()
    (let loop ()
      (define next (dequeue! q))
      (cond
        [(or (not (in-bounds? next)) (get-color-at next #f)) (loop)]
        [else
         (match-define (pt x y) next)
         (for* ([xd (in-range -1 2)] [yd (in-range -1 2)])
           (enqueue! q (pt (+ x xd) (+ y yd))))
         next]))))
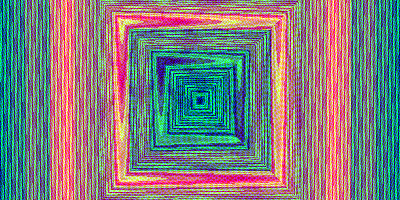
Not very functional code, but it certainly does work. The beauty of using a queue here is that by processing each pixel in the order it was added, we will do each layer in turn. As we do each layer, the next is added to the end of the queue. It’s arguable which code is cleaner between this and in-spiral.
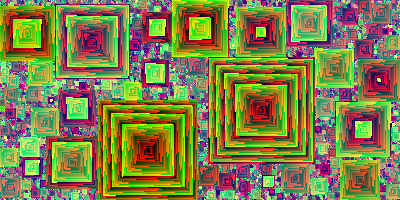
Neat. Okay, how about we take that code one step further. Rather than generating a single square, how about we generate a seed square randomly in the image, expanding it until we hit the edge. Once we do, generate another square, repeating over and over again with smaller and smaller seeds. Something like this:
; Generate random squares each until they hit an edge or another square
(define-order-producer (square-fill width height get-new-color get-color-at)
  (define q (make-queue))
  (enqueue! q (pt (random width) (random height)))

  (define this-square (make-hash))

  (define (in-bounds? p)
    (match-define (pt x y) p)
    (and (>= x 0) (< x width)
         (>= y 0) (< y height)))

  (λ ()
    (let loop ()
      (define next (dequeue! q))
      (cond
        ; Already set, try again with this square
        [(hash-has-key? this-square next)
         (loop)]
        ; Out of bounds or already set, seed a new square
        [(or (not (in-bounds? next))
             (get-color-at next #f))

         (queue-filter! q (const #f))
         (hash-clear! this-square)

         (enqueue! q (pt (random width) (random height)))
         (loop)]
        ; Otherwise, return that point and queue up its neighbors
        [else
         (match-define (pt x y) next)
         (for* ([xd (in-range -1 2)] [yd (in-range -1 2)])
           (enqueue! q (pt (+ x xd) (+ y yd))))
         (hash-set! this-square next #t)
         next]))))
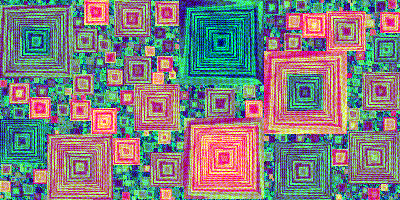
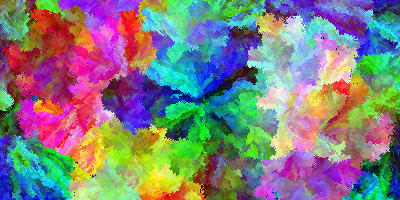
This is actually one algorithm where the more abrupt changes of the cascade algorithm really look neat:
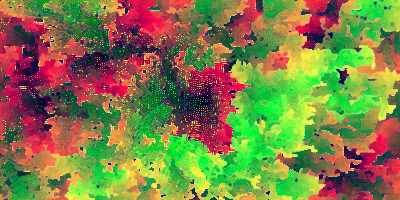
Next, let’s take a similar idea, but instead of squares, let’s go back to something I posted about all of the way in 2012: random walk / bugs.
Basically, start with a seed as before. This time though, randomly expand in one of the eight possible directions. If that doesn’t work (either it’s an edge or already set), try another direction until we fail at all eight. If that’s the case (and we’ve walked ourselves into a corner), generate a new seed.
; Walk randomly, starting a new seed if there are no more options
(define-order-producer (random-walk width height get-new-color get-color-at)
  (define current-point (pt (random width) (random height)))

  (define (in-bounds? p)
    (match-define (pt x y) p)
    (and (>= x 0) (< x width)
         (>= y 0) (< y height)))

  (λ ()
    (begin0
      current-point

      (let ()
        (match-define (pt x y) current-point)
        (define next-point
          (or
           ; Find a neighboring point that hasn't been set
           (for*/first ([xd (in-list (shuffle (range -1 2)))]
                        [yd (in-list (shuffle (range -1 2)))]
                        [neighbor (in-value (pt (+ x xd) (+ y yd)))]
                        #:when (and (in-bounds? neighbor)
                                    (not (= xd yd 0))
                                    (not (get-color-at neighbor #f))))
             neighbor)
           ; If that doesn't work, generate a new seed
           (let loop ()
             (define new-seed (pt (random width) (random height)))
             (if (get-color-at new-seed #f)
                 (loop)
                 new-seed))))

        (set! current-point next-point)))))
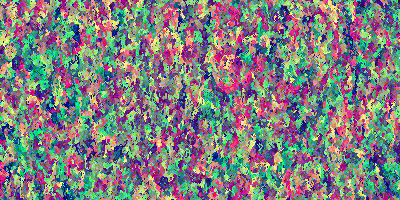
It’s really neat how you can see the structure in each of the images, where fairly large initial walks fill in large regions and then as the space gets more and more full, you get more noise as walks generate only a pixel or two.
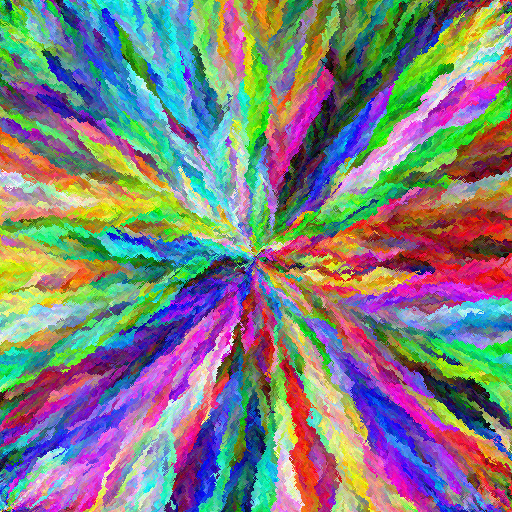
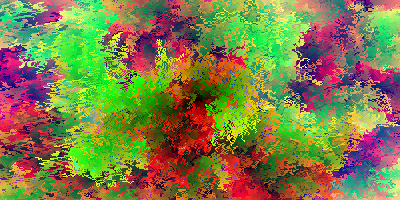
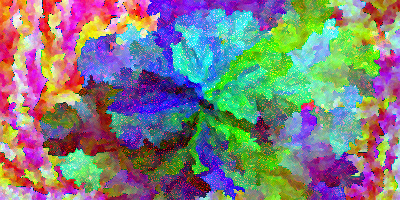
Okay, and now the big one. This is honestly the response to the StackExchange post that got me the most interested in the first place, generating some really stunning images. Here’s the basic algorithm:
- Generate a set of border points
B, set to some initial small set of points - While
Bis not empty:
- Generate a new color
c - For each point
b∋Bcalculate an error value if we were to placecatb - Place
cat thebwith the minimal error - Update
Bby removingband adding points adjacent tobthat have not already been set
That’s a bit of a mouthful, but it’s relatively straight forward to turn into code:
; Organically grow outwards, finding the best match among border pixels

; combine is how distances of border pixels are combined
; missing is the initial value and the value used if a point is missing
; after is called once with the final value (defaults to identity)
(define (make-grower #:combine combine
                     #:missing missing
                     #:after [after identity]
                     #:seeds [seeds #f])
  (λ (width height get-new-color get-color-at)
    (define border (make-hash))
    (if seeds
        (for-each (λ (seed) (hash-set! border seed #t)) seeds)
        (hash-set! border (pt (quotient width 2) (quotient height 2)) #t))

    (λ ()
      (define new-color (get-new-color))

      ; Loop through all border pixels to find the best match
      (define-values (_ best-point)
        (for/fold ([best-distance +inf.0] [best-point #f])
                  ([(point _) (in-hash border)])

          ; Find the minimum distance to pixels adjacent to that border
          (define new-distance
            (after
             (for*/fold ([new-distance missing])
                        ([xd (in-range -1 2)] [yd (in-range -1 2)])
               (define c (get-color-at (pt+ point (pt xd yd)) #f))
               (combine new-distance (if c (rgb-distance new-color c) missing)))))

          (if (<= new-distance best-distance)
              (values new-distance point)
              (values best-distance best-point))))

      ; Update the borders without that point but with it's neighbors
      (hash-remove! border best-point)
      (match-define (pt x y) best-point)

      (for* ([xd (in-range -1 2)]
             [yd (in-range -1 2)]
             [new-border-point (in-value (pt (+ x xd) (+ y yd)))]
             #:when (and (not (= xd yd 0))
                         (>= (+ x xd) 0) (< (+ x xd) width)
                         (>= (+ y yd) 0) (< (+ y yd) height)
                         (not (get-color-at new-border-point #f))))
        (hash-set! border new-border-point #t))

      best-point)))
I did say relatively. 😄 One thing to note is that we’re doing something a little different here. Rather than directly defining a new ordering function, we’re going to define several. That’s the beauty of higher order functions is that we can make one function (like this one) and parameterize it over how exactly that error function is calculated. Specifically (as noted in the comments), we have 3 variables that determine how error is defined:
combine- how do you combine the error of multiple already set pixels adjacent to a border pixelbzero- the initial value for the error, also used for neighboring pixels that are not currently setafter- a special function I needed when I wanted to average the error over the surrounding pixels
Specifically, with these three functions, we can define (at the very least), the following error functions:
grow-minimum- take the color distance to the neighboring pixel closest to the new colorgrow-minimum- likegrow-minimum, only take the worst neighborgrow-average- take the average color of any set neighbors and use the distance to that as the error
We can use the make-grower function to define these as such:
; Choose the border pixel closest to any one of its neighbors
(define-order-producer (grow-minimum width height get-new-color get-color-at)
  ((make-grower #:combine min #:missing +inf.0)
   width height get-new-color get-color-at))
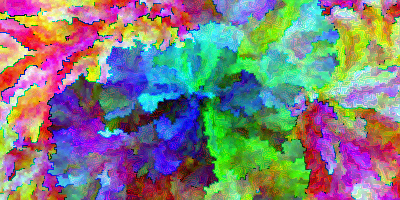
; Choose the border pixel closest to the furthest away neighbor
(define-order-producer (grow-maximum width height get-new-color get-color-at)
  ((make-grower #:combine max #:missing -inf.0)
   width height get-new-color get-color-at))
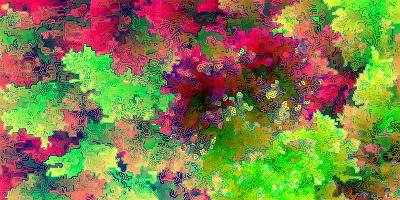
; Choose the border pixel where the difference from the average of already placed pixels is minimal
(define-order-producer (grow-average width height get-new-color get-color-at)
  ; Sneaky trick to track both sum (real) and count (imagionary)
  ((make-grower #:combine (λ (old-v new-v) (+ old-v new-v 0+1i))
                #:missing 0
                #:after (λ (v) (if (= v 0) 0 (/ (real-part v) (imag-part v)))))
   width height get-new-color get-color-at))
The oddest one is grow-average. Since we need to track both the sum and the count (since we don’t know how many neighbors are actually set), we’ll use imagionary numbers. Then we can use that #:after parameter to do the final division.
I really also like how different grow-minimum and grow-maximum are, despite how similar their definitions are. Specifically, since in the latter we take the worst case error, we get neat ridges between the expanding color sections which are only filled right at the very end. Likewise, grow-average has it’s own distinct feel. Because of the averaging of the error, it tends to be much more muted.
Another interesting note is runtime. Because of how the border pixels are filled in, grow-maximum will have a much longer list through most of its run. Furthermore, since we have to compare every current border pixel to each new color, that results in a correspondingly longer runtime. While they would have the same runtime in Big O notation, the constants are very different.
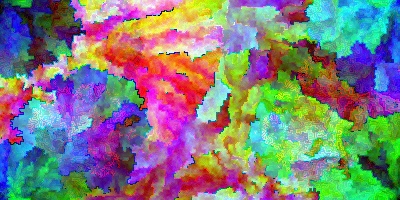
You may be asking yourself, so what about that #:seeds paramater? Well, with that, you can do something like this: growing in from the edges rather than from the center:
(define-order-producer (grow-maximum-corners width height get-new-color get-color-at)
  ((make-grower #:combine max #:missing -inf.0 #:seeds (corners width height))
   width height get-new-color get-color-at))

And… that’s that. That’s all of the different algorithms I’ve come up with thus far. I have a few more ideas percolating in the back of my head (in particular, the idea of combining the ideas in this post with those in palette swapping), but those will have to wait for another day.
Putting it all together
Before we go though, I think it would be interesting to show how I’ve been putting these images all together. Given one of each producer, how do you render that into an image?
; Given a color and order producer, make an image
(define (render width height rgb-producer order-producer)
  ; Initialize the image to error pixels
  (define output (make-vector (* width height) (void)))

  ; Access a pixel, will be given to order producer
  ; If default is set, return that on unset or out of bounds
  (define (get-pixel p [default (void)])
    (match-define (pt x y) p)
    (cond
      [(and (>= x 0) (< x width)
            (>= y 0) (< y height))
       (define v (vector-ref output (+ x (* y width))))
       (cond
         [(not (void? v)) v]
         [(not (void? default)) default]
         [else (error 'get-pixel "pixel at ~a,~a undefined, no default specified" x y)])]
      [(not (void? default))
       default]
      [else
       (error 'get-pixel "invalid coordinates ~a,~a (size = ~a,~a)" x y width height)]))

  ; Set a pixel in the final image, error on out of bounds
  (define (set-pixel! p c)
    (match-define (pt x y) p)
    (cond
      [(and (>= x 0) (< x width)
            (>= y 0) (< y height))
       (vector-set! output (+ x (* y width)) c)]
      [else
       (error 'get-pixel "invalid coordinates ~a,~a (size = ~a,~a)" x y width height)]))

  (define count (* width height))

  ; Accessor for within the location producer to get the next color
  (define current-color #f)
  (define (get-current-color) current-color)

  ; Create the producers, cannot directly use for since we need to set the current color
  (define next-rgb (rgb-producer count))
  (define next-location (order-producer width height get-current-color get-pixel))

  (for ([index (in-range count)])
    (define color (next-rgb))
    (set! current-color color)
    (define location (next-location))
    (set-pixel! location color))

  ; Generate the resulting image, setting errors to magenta
  (flomap->bitmap
   (build-flomap*
    4 width height
    (λ (x y) (get-pixel (pt x y) (vector 1 1 0 1))))))
Basically, it’s very similar to how we were working with palette swapping. We generate a vector to hold the colors as we’re generating them, since build-flomap* doesn’t give us a mutable image. Then we created a getter/setter for that same vector, the former of which we will be passing into the location producers above (as get-color-at). Finally, we loop through the colors.
I would optimally have rather used in-rgb-producer and in-order-producer here, but unfortunately that doesn’t quite work. Since we need to know what the color generated by the former is in the latter, we have to add another instruction. So it goes.
And… that’s it. Really this time. There’s also a bit of test code for generating a bunch of test images along with all of the rest of my code available on GitHub: allrgb.
If you have any great ideas for more producers, I’d love to see them. Feel free to leave a comment / make a pull request / shoot me an email. If they’re particularly neat, I’ll add them here / to the repo above.
Oh hey, since I already generated it anyways: